
I have had many people ask me over the years how I obtain good quality photographs underground, I thought I would include this description and some diagrams of the techniques involved. It was written by my good friend, and fellow underground explorer Nick Catford, who I must say taught me the techniques involved.
The Article was first published in “The Bulletin” the official Publication of Subterranea Britannica in January 1988.
Underground Photography - Conventional Wet Film Cameras
Many hundreds of books have been written about photographic techniques since the first photographic image was produced by Joseph Niepce in 1826, and although the use of artificial light has been discussed in very great detail by many eminent authors, the technique of lighting large enclosed areas has been virtually ignored. A small flash gun is quite adequate in the home where a range of a few feet is all that is required, but lighting a passage 100 feet (30 m) in length with a flash mounted on a camera is a virtual impossibility, as the light from the flashgun will only carry a short distance, even at fairly large lens apertures.
Large interiors of buildings can obviously be adequately lit with electric lighting if there is a power source available, but the industrial archaeologist, who is mainly dealing in dereliction, is faced with problems when lighting the interiors of derelict buildings, and even greater problems when lie takes his camera into mines, railway tunnels and various other holes in the ground.
Often, derelict buildings are partially lit by day light streaming through windows and holes in roofs, and the use of a sturdy tripod should allow a long exposure without the need for any additional artificial lighting. In this sort of situation any windows or other areas open directly to daylight will be grossly overexposed which can be partially compensated for at the printing stage, assuming that prints are the end result. It may be possible to decrease the exposure time by lighting the darker corners with electronic flash. So long as the exposure is fairly long the camera will not see a speedily moving photographer in front of the lens dashing from one concealed point to another to fire the flash gun.
When calculating long exposures the photographer must take note of "reciprocity law failure" which is the failure of the reciprocal relationship between time and intensity in affecting exposure. This means that when exposing at very slow speeds (longer than one second) the exposure time, as indicated by an exposure meter, will have to be increased. For example, if the indicated exposure is 8 seconds, the correct exposure would be 16 seconds (or a 1-stop increase in the aperture). If, however, the indicated exposure is as long as 10 minutes, which is not unknown in many semi-subterranean sites, the correct exposure would be 68 minutes and 22 seconds. Exposure can be corrected without any problem with black and white film, assuming the appropriate tables are carried. Colour film is made of three different emulsion layers and each layer is affected to a different degree, so correction is virtually impossible.
In most underground situations, no light source is available apart from that carried by the photographer. In the first instance, consideration should be given as to the best equipment to use. It is possible to take photographs underground with an ordinary domestic camera with its own built-in flash, but this sort of equipment is unlikely to give good results. It is preferable for the flash to be detached from the camera, to allow the gun to be fired more than once. A tripod will have to be used to ensure the camera is in the same position each time the flash is fired. A very sturdy tripod is desirable, but not so bulky that it is difficult to transport underground.
Secondly, attention must be applied to the type of camera. Polaroid’s and small format cameras (disc or 110) are not suitable but any 35mm camera with a B or T setting on the shutter (to allow time exposures) should do. 35mm is obviously preferable for slides but for prints a larger format is more suitable as this allows a higher quality of enlargement. It is virtually impossible to keep a camera clean underground so something that is well built and rugged is advantageous.
Thirdly, consider the lens. A wide angle lens will give a large angle of view and is useful in a narrow passage, but in a large cavern the greater coverage will require more light so a standard lens is perfectly acceptable. Tele-photo lenses are not usually of much use underground.
The choice between slides and prints is a personal one, but it must be remembered that the exposure for slides is far more critical than for negatives. For slides, half a stop cither side of the correct exposure is all that is acceptable, while with negative film a couple of stops out will probably still produce acceptable prints. As under-ground photography relics on a certain amount of luck and guesswork as far as lighting is concerned, success is more likely to be achieved with prints, especially if hand printing is available as the operator has control over the enlargement. The main disadvantage of hand printing is that it is considerably more expensive than machine printing that is available from chemists and postal laboratories. If slides are required it may be preferable to make slides from prints. When photographing fairly narrow passages, a medium speed film is advisable (100 ASA) to avoid over-exposing the foreground and to allow very even illuminations. Large caverns will often require higher speed films.
When prints are to be produced it is useful to place some-thing of known colour in the picture to allow accurate colours to be achieved at the printing stage. A Kodak standard grey card is most suitable.
The most important equipment underground is the lighting. Flash powder is still occasionally used but it is difficult to obtain and difficult to control so the choice is between flash bulbs and electronic flash. Flash bulbs come in many sizes, and generally give out more light than electronic flash. The main disadvantage of bulbs is that they can only be used once and are therefore quite expensive. PF60s (or equivalent) are the largest bulbs still available today and at £1 per bulb it is not very economical when 10 or 12 bulbs may be needed for one shot. They do, however, give out a lot of light. Smaller bulbs, such as the more easily available PF1, give out no more light than a small electric flash unit and are therefore not really worth considering.
A medium sized portable flash unit with detachable head (such as the Metz CT 45) is the most suitable form of light source but it may be necessary to supplement the internal batteries if a large number of photographs are to be taken in one session. A large Ni-Cad pack or a sealed lead acid battery is suitable.
Having assembled all the appropriate equipment, the next step is to learn the technique of "picture building". As an example, a long narrow passage with no places to hide a flashgun has to be photographed.
Using an aperture of fl6 and the flash at the camera position (Figure 1), only a small area in front of the camera will be illuminated. A larger aperture would allow the flash to carry a lot further but would lead to over-exposure in the foreground, especially in a narrow passage, and would give a limited depth of field (the distance between the nearest and furthest points that are in focus). As it is not advisable to increase the size of the aperture the only way to illuminate further down the passage is to fire the flash from a point some feet in front of the camera. If this was the sole source of illumination (e.g. 6 feet (2 m) in front of the camera), the light would travel further down the passage but the area immediately in front of the camera would receive no light (Figure 2) and a silhouette of the person holding the flashgun would be clearly visible.
Figure 1. Flash at Camera.

Figure 2. Flash in front of Camera.
If the passage is lit from two points, the camera position and from some feet in front (Figure 3), the passage will be illuminated for twice the distance achieved from the camera position alone. If the flash positions are care-fully plotted, it should be possible to eliminate the silhouette of the person holding the flashgun in front of the camera. Why doesn't the camera see the person holding the flashgun? As already mentioned, the person holding the flashgun would only appear as a silhouette as the light from the gun is directed forwards (away from the camera). As a silhouette is an area that has received no light, if that area is then lit (i.e. from the camera position) the silhouette should then disappear and there should be an uninterrupted view of the passage.
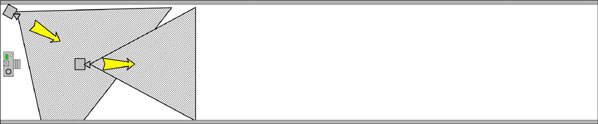
Figure 3. Flash in front and at Camera.
It should be possible to walk along one wall firing the flash at 6-8 foot (2-2.5 m) intervals (Figure 4). The flash should always be aimed forwards at an angle of 45° to the wall. This should evenly illuminate the opposite wall but will leave a row of silhouettes along the unlit side. To remove these, and light the opposite wall a staggered set of flashes should be fired along the other side as well (Figure 5).The end result, if the flash positions are carefully plotted, should be an evenly illuminated passage lit to the furthest point that the film can usefully resolve.
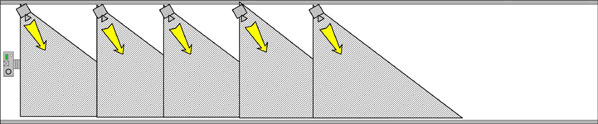
Figure 4. Flash at 2.5M (7.0') intervals along one wall.
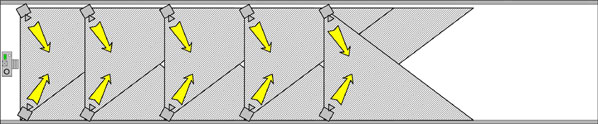
Figure 5. Flash at 2.5M (7.0') intervals along both walls.
In most practical circumstances the accurate positioning of the flash would take so long that is acceptable to leave the actual positions to guesswork and luck. It is useful to leave some kind of light close to and behind the camera, to give an indication of where the camera is located. This is useful when the passage bends, to save lighting a section of passage that the camera can't 'see'. Moving from one flash position to another it is useful to employ a helper to cover the lens while you move about with the aid of a torch. Once the lens is uncovered all lights in front of the camera should be extinguished.
This method of lighting will work well in a relatively narrow passage (up to 10 feet (3m) wide). In wider passages or chambers, it may be necessary to have another two lines of flash positions either side of the passage centre line (Figure 6). In this situation careful flash positioning is even more critical to ensure even illumination. Also, if a passage is more than 8 feet (2.5 m) high each flash position should have one flash angled forwards and another angled upwards.
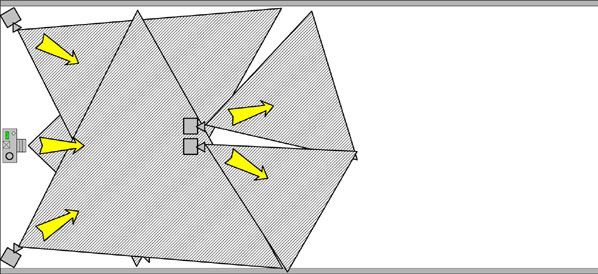
Figure 6. Flash along walls and centre of a wide passage.
In many circumstances the flash can be fired from concealed positions (that cannot be seen by the camera) (Figure 7) e.g. behind pillars, round corners, up side passages etc. It is, however, unlikely that there will be sufficient concealed positions to allow complete and even illumination, so that it is more usual to build a picture up with the flash located in exposed and concealed positions (Figure 8).
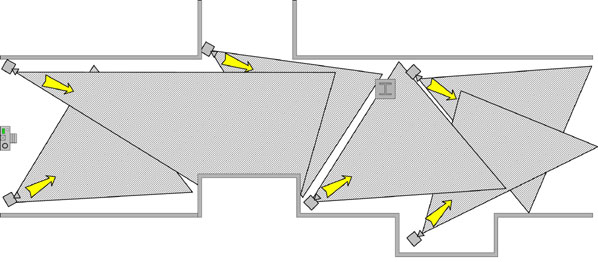
Figure 7. Flash in concealed positions
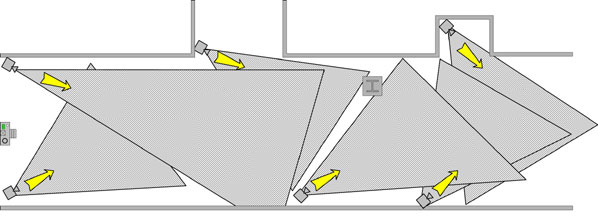
Figure 8. Flash in open and concealed positions
In large chambers, this method of multiple flash lighting is more difficult to achieve. Some of the North Wales slate mines, for example, have chambers that are several hundred feet high. In this sort of situation the use of medium speed film and a small aperture is out of the question. The only answer is to use high speed film and a large aperture. Colour film is available up to 1600 ASA and black and white film can be up rated as high as 6400 ASA, which means that far less light is required to achieve an exposure. Unfortunately, under these conditions, the picture quality will suffer. High speed films are always a lot more "grainy", which gives a lack of sharpness. Lenses also suffer from edge distortion at large apertures as well as giving a small depth of field (which might not matter in such large areas). The fact that the lighting must come from one level (the camera level), means that the foreground will receive a lot of light, and the background not enough. Not a very satisfactory situation but it should be possible to achieve an acceptable image, assuming that negative film is being used.
Some subterranean passages are very small, and this presents another problem. A person in a small tunnel firing a flash gun would obviously fill the tunnel so that no light from the flash would be able to gut past and reach the lens. It may be possible to set up a line of remotely controlled flash guns along the lines already described. An alternative method of lighting called "painting with light" could be employed. For this technique a powerful torch (such as a 100 watt halogen lamp and battery pack) with a narrow beam is required. With the shutter open the torch beam should be directed along the passage, continually keeping the beam on the move. To a certain extent this method of lighting involves a lot of trial and error, but with practice it should be possible to evenly illuminate a fairly long passage of very small dimensions.
One of the main disadvantages of using a torch is the fact that the colour temperature of the torch is unlikely to match up with any currently available film. Luckily we have graphics programmes such as Photoshop and Paint Shop Pro, available to us to sort out these minor colour imperfections.
Sometimes it is necessary to photograph footprints, tool marks, carved inscriptions etc. A single flash from the camera position might seem the obvious answer as the distances involved aren't likely to be very great. However, the results achieved by this method of lighting can be very disappointing. What is required is a method of lighting that will emphasise the tool marks, footprints etc., and make them stand out. A tool mark will leave a slightly raised surface. By placing a light or flash gun at an acute angle to the wall it should be possible to emphasise these marks by the shadows that are cast. In practice, it is usually advisable to include some frontal lighting (Figure 9) so that tile shadows are not too harsh that they obscure some of the detail. This "texture" lighting is often employed when photographing buildings where a more striking photograph can be achieved by having a low sun at one side of the building rather than behind the camera.
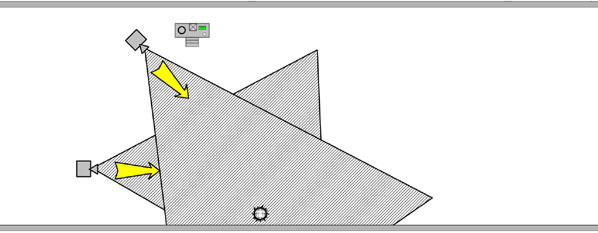
Figure 9. Side lighting.
When this was written in 1988, digital photography was in its infancy and far beyond the means of most of us. In the intervening years photographic technology has come on in leaps and bounds and digital cameras have captured a large share of the market. Eventually, traditionally chemical photography will be rendered obsolete with the increasing cost of silver, the main ingredient of photographic emulsions and the decreasing cost of the electronic alternative.
Despite all these technological advances there is not yet a cheap digital camera capable of giving long exposures so many of the techniques detailed above cannot be undertaken as they require an open shutter, sometimes open for many minutes. To a certain extent it is possible to overcome this deficiency by using slave flashes that can be electronically triggered by the main flash at the camera. This sound good in theory but in practice, unless all the flashguns of the same power the results are likely to be disappointing at best. The results are likely to have a very high contrast with some areas very dark and others completely bleached out. The overall picture quality will be far inferior to that of a cheap film camera.
Digital photography does have its place. In daylight the results are perfectly acceptable under normal lighting conditions but the deficiencies of a digital camera soon become apparent under difficult lighting (for example shooting into the sun). Underground there is little problem if artificial lighting is available even if it is of a low intensity, although this will probably require the use of a tripod. If a subject can be a lit with a single flash, the results too are often quite acceptable although as with conventional camera the built in camera flash is always too small to carry more than a few feet and an external flashgun will have to be used.
Digital photography is here to stay and eventually cameras will be developed that have the versatility of conventional film cameras but we’re not there yet and in my opinion digital photography underground should only be considered as a back up or as a last resort.
In conclusion, it is useful to remember that dark walls absorb light and therefore need more of it, and light walls reflect light and therefore need less of it.
Nick Catford (1988 amended 2003)